Sunday 30 March 2014

Sketchy Watercolour

I love all of my Stampin' Up goodies, and I'm always on the look out for bits and pieces to enhance what I can make out of them - so when I came across some Watercolour paper which was made out of recycled cotton rags and had pressed stems and flowers running through them I just had to have it.  You can see one of the petals on the right hand side of the card below. 

How beautiful is the hostess set 'Simply Sketched'? It's a really pretty stamp even when you don't add any colour so you can make some beautiful but fast cards with it - and I thought it was the perfect stamp set to try with my new watercolour paper. 

I stamped in black Staz On using all three of the main stamps from the set.  I then built up the colours - Pink Pirhouette, Blushing Bride and Rose Red for the flowers, and Pistachio Pudding and Always Artichoke for the leaves and stems.  I find I do this MUCH better when I'm not concentrating on it so well and giving it a little time to dry between layers so I took on this task while watching 'Life of Pi'.  I wasn't convinced I wanted to watch it but it's a beautiful movie - well worth a view!


I backed my Watercoloured Simply Sketched onto Rose Red Cardstock, and then in turn onto Pink Pirhouette - which I had run the Very Vintage Wheel over - also in Pink Pirhouette.


I really like the overall effect - I'll be saving this to give to someone special!

Leigh-Anne
x

Monday 24 March 2014

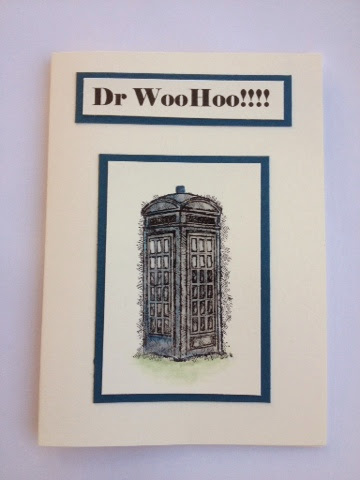
Dr Woohoo!


Who can resist a Dr Woohoo card?? A fellow Dazzling Dreamer came up with this concept a couple of years ago for one of our friends who passed her final GP exam, and now another of my friends has just found out she passed hers - WOOHOO!! It's a really daunting and very expensive exam and it's one you really, really don't want to fail, and she's an excellent trainee so I'm really pleased for her. 

I printed the Dr Woohoo onto Very Vanilla in a font I thought went well and then I turned my attention to the tardis.....


This is last years Sale-a-Bration set - we don't have anything similar at the moment that would work for this concept so you'll have to forgive the used of a retired stamp.  I added the little bit to the top and coloured the top few windows white to make it a little more convincing as a tardis, and I finished it off with crystal effects over the whole of the Tardis - you get a little bit of an idea of it from the picture below but it's really better when you see it in real life!

I hope she likes!

Leigh-Anne x


Tuesday 18 March 2014

Whitewashed Garden

I've shown this technique once before and and I just had to come back to it with the hostess set Simply Sketched and Papillon Potpourri.


It's a simple but slightly time consuming technique, and well worth the effort.

I heat embossed using a Versa Mark inkpad and white embossing powder.  I then coloured in the butterflies and the flowers/leaves using white craft ink and an aqua painter.  Once you have a slightly opaque white background leave it to dry before adding colour, again using an aqua painter.

I used Wisteria Wonder, Rich Razzleberry, Rose Red, Pistachio Pudding and Always Artichoke on this version.  You can't beat a few Basic Pearls to bling it up a little - the sheen of the pearls works really well on this one.

I hope you have a go! Enjoy!

Leigh-Anne

Sunday 16 March 2014

New Baby Card

This card is for my friend Carol, who has just given birth to her second Son, Dominic.  My February card class has been credited with his unexpected and swift arrival the following day at her home - or more specifically the discussion around not having a bag packed for the hospital already! Carol packed her bag the following morning and Dominic arrived safe and well that afternoon, just with a little less warning than expected!

So - I needed a really fast, cute new baby card!!!! This one was pretty super speedy - and now I have my very own vest template it'll be even faster when I need another one.

For this one I drew a baby vest on scrap paper - in fact I drew the left half and then put that onto a folded piece of card, which I then used as my template to make sure my vest was symmetrical. I used my paper piercing tool and used two brads from the subtles collection as buttons, before dimensionalling it up on a piece of Marina Mist cardstock and a Vanilla card base. I made sure 'hello baby' from the set teeny tiny sentiments was straight by using the stamp-a-ma-jig (affectionately named 'Bruce' by my class ladies) and I used black staz on ink.

I hope you like!

Leigh-Anne x


Monday 10 March 2014

Lucky me!


How lucky am I? My fantastically romantic Husband snuck into my craft room while I was at work and made me this fabulous Birthday Voucher entitling the Bearer to Afternoon Tea at Fortnum and Mason! I'm thrilled by the afternoon tea but even more thrilled by the effort he put into making the voucher - Pool Party and Cherry Cobbler colour palette and look at all the daubing and the ribbon - he used a stamp I hadn't even got around to using yet! Impressed.com :)

Saturday 8 March 2014

Mothers Day Flowers

It's nearly time to show our Mummy's how much we love and appreciate them! Are you looking for a Mothers Day Card? Why not try this one.  You've got the card and flowers covered all in one.  This one was partly inspired by a card my Husband bought me for my Birthday - it's super simple and really fast.


The colour combination is Real Red, Crumb Cake, Coastal Cabana, as dictated by the beautiful Fresh Prints DSP stack in the spring/summer catalogue (Catalogue Order  number 132996, £6.25 for 48 sheets) with a little bit of Bermuda Bay to make it pop.  

The card is a 5 inch square base of Crumb Cake, and a 4.5 inch square topper of Real Red.  You could make your own envelope for this one using your Envelope Punch Board or your Simply Scored Board :)


This one is pretty much about using your Scissor Snips and hand crafting most of the shapes.  I hand cut the DSP leaving a nice pinch point to pop a piece of Silver Baker's Twine around (132976, £3.25 for 22.9m), and then stuck a small strip of Coastal Cabana behind it and again used my scissor snips to create a contour.  The leaves are hand snipped Crumb Cake scraps and the flowers are cut using the Itty Bitty punches and they have some Basic Pearl Jewels on them.

I used dimensionals for the bunch of flowers and then a combination of Tombo and dimensionals for the flowers.  Unusually I also dimensionalled up the Real Red Square - it's very 3D this card! Just beware if you're going to post it - cut down on the layers that are dimensionalled up to keep the postage down


Let me know what you think!

Leigh-Anne x

Stained Glass Delicate Doilies

What a fantastically sunny day to wake up to this morning! Perfect for showing you my stained glass delicate doilies card :)


This card is very simple, but quite time consuming.  It's essentially a colouring in task which is always very relaxing you just need some time to do it. It's also one of those projects that's perfect to carry around in your handbag for when you have a spare minute - once you've done the gold embossing all you need is a blender pen and a couple of colours so it's a great one to do on the move or in front of the TV.

I gold embossed delicate doilies onto velum, before gently colouring it in using blender pens.  I went for a pink and purple colour palette on this one - Rich Razzleberry, Strawberry Slush - and then Crushed Curry for a bit of contrast.


Once I'd got my velum window ready and waiting I used Whisper White cardstock to frame it.  I essentially did a regular size card (A5) and used my guillotine to cut 1.5cms in from the outside all the way around on the front of the card.  I then put my velum cardstock behind and adhered it using sticky strip before placing another piece of card over to make it lovely and neat! The covering piece of card is the same size as the card front and again I used the guillotine 1.5cms from the outside all the way around.  You could adhere this with Tombo but I decided to go with sticky strip all the way for this project - I didn't want any wet glue near my beautiful velum design!

The inside of the card - all neatened up!
I think I will probably write my message on the very back of this card so that it doesn't show through the stained glass effect......

I hope you enjoy! I think ill probably be making a few more of these with some other stamp sets :)

Leigh-Anne x


Wednesday 5 March 2014

Garden Box Card


Gold embossing glows beautifully in warm light :)


Over the past couple of weeks or so it seems that EVERYBODY  is making this box! It's making it's way around the Inspirin' Inkees (Amanda Fowler's Team), and the Dazzling Dreamers (Liz Shannon's Team) teams.  This is a real 'WOW' card which goes from conveniently folding flat into a regular size envelope, to being an all singing all dancing box card and it's just incredibly versatile.  You can find a video with instructions on Very Victoria's Crafts on Youtube here and there are plenty of examples of other designs if you have a peruse online.

This is the watercolour paper and gold embossed butterfly in natural light


For a quick reference once you've looked at Victoria's video for the technique, the dimensions are A5 size cardstock, scored at 7.3cm along the short edge (i.e ~half way), and at 2,4,6 and 8 inches along the long side.  Don't forget to NOT fold down the back panel!

I based mine on a garden theme and guess what made another appearance...brushed gold cardstock and embossed gold powder, along with my favourite retired stamp set at the moment, elements of style.  I have used the very vintage wheel in crumb cake on the brushed gold cardstock to add a bit of texture.  The other card colour bases I used were pink pirhouette (also then with very vintage rolled onto it in blushing bride) and always artichoke for the leaves and grass - made out of little leaves sizzlits and a lot of snipping!


I gold embossed the apothecary art and the elements of style stamps onto watercolour paper, and I then watercoloured using blushing bride, strawberry slush, crisp canteloupe, pistachio pudding and always artichoke.

I've put it all together and added the finishing touches of Papillon Potpourri butterflies gold embossed onto velum, and coloured using blender pens and the same colour palette. I used a little flower wire for the larger butterfly to get is standing prouder.


I've left my greeting blank for now so that I can use it for a number of occasions......

I hope you like!x